Everything Atout Audio does, section by section.
Covers version 1.0.0. Looking for quick answers instead? Check the FAQ.
Getting started
Atout Audio is a real-time EQ, Dynamic EQ, and Compressor application that applies directly to your Windows system audio. The first time you launch it after installing, a license activation screen appears — activation has to complete before you can use the app.
Install & first launch
Run the downloaded installer and follow the prompts to complete installation.
Once installed, the app launches automatically and shows the license entry screen.
Enter the license key you received by email at purchase, then click Activate.
Once activated, you're taken to the main screen — you won't need to enter it again on future launches.
Main screen overview
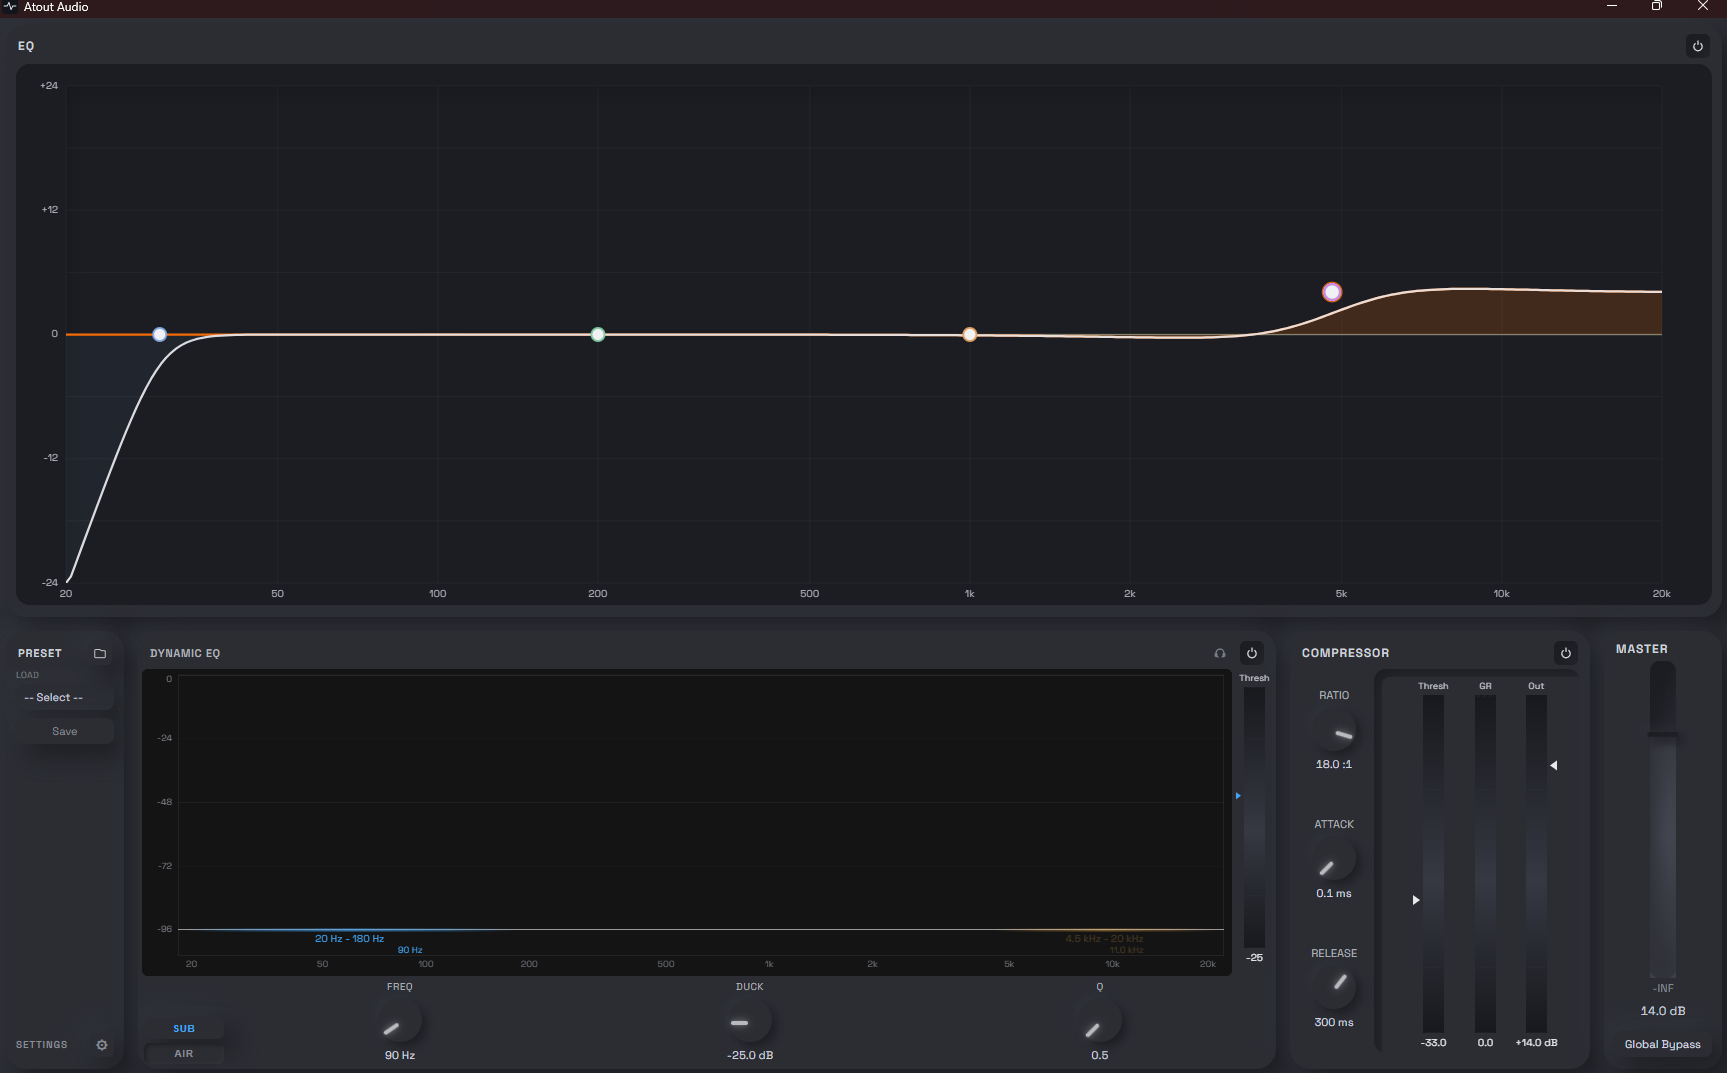
The main screen is made up of the EQ graph at the top, and four panels below it: Preset, Dynamic EQ, Compressor, and Master.
| Area | What it does |
|---|---|
| EQ graph | The main equalizer — shape tone across up to 8 bands |
| Preset panel | Save and load your settings by name |
| Dynamic EQ | Sub (low end) and Air (high end) — two bands that respond automatically to signal level |
| Compressor | Compresses sound above a set threshold to control dynamic range |
| Master | Final output volume, plus Global Bypass for all effects |
EQ (parametric equalizer)
EQ lets you shape tone across up to 8 bands, each set as a Cut, Peak, or Shelf-type filter. Double-click the 0dB line on the graph to add a new band.
Adding & editing bands
- Double-click the 0dB line on the graph to add a new band (up to 8 total).
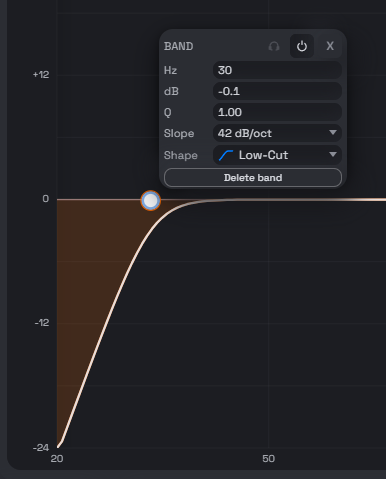
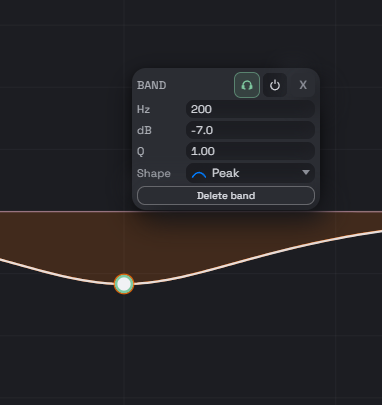
- Click a band point to open its edit panel, where you can set Hz, dB, Q, and Shape precisely.
- Click the headphone icon to Audition just that band in isolation and dial in the exact spot (Peak bands only).
Shape — 5 filter types
| Shape | Description |
|---|---|
| Low-Cut | High-pass filter that removes everything below the set frequency |
| Low Shelf | Raises or lowers the entire range below the set frequency |
| Peak | Raises or lowers a bell-shaped range centered on the set frequency (the most common EQ type) |
| High Shelf | Raises or lowers the entire range above the set frequency |
| High-Cut | Low-pass filter that removes everything above the set frequency |
Parameter ranges
| Parameter | Range | Description |
|---|---|---|
| Hz | 20 – 20,000 | The band's center (or corner) frequency |
| dB | -24 – +24 | Gain at that frequency — positive boosts, negative cuts |
| Q | 0.5 – 20 | Band width — higher values are narrower and sharper |
| Slope | 6 / 24 / 42 / 60 / 78 / 96 dB/oct | Rolloff steepness, shown only for Low-Cut / High-Cut |
Dynamic EQ
Dynamic EQ only reacts once the signal level crosses a set Threshold. You can configure two bands independently: Sub (low end) and Air (high end).

Sub / Air tabs
| Tab | Description |
|---|---|
| SUB | Detects and shapes the low end |
| AIR | Detects and shapes the high end |
Parameter ranges
| Parameter | Range | Description |
|---|---|---|
| Freq (Sub) | 20 – 1,800 Hz | Sub band's center frequency |
| Freq (Air) | 4,500 – 20,000 Hz | Air band's center frequency (100Hz steps) |
| Duck | -30 – 0 dB | How far to pull the level down once the threshold is crossed |
| Q | 0.5 – 5 | Width of the detection band — lower is wider, higher is narrower |
| Threshold | -60 – 0 dB | Only signals above this level trigger a response (drag vertically to adjust) |
Compressor
Automatically pulls down sound louder than a set Threshold to control dynamic range. Found in the Compressor panel at the bottom right of the main screen.

Knobs
| Control | Range | Description |
|---|---|---|
| Ratio | 1:1 – 20:1 | How strongly sound above the threshold is compressed |
| Attack | 0.1 – 500 ms | Time before compression kicks in — shorter reacts faster |
| Release | 10 – 2,000 ms | Time for compression to release — longer returns to level more gradually |
Meters (3 vertical bars)
| Meter | Description |
|---|---|
| Thresh | Sound above this point starts being compressed. Drag vertically to adjust, -60 to 0dB |
| GR | Shows how much gain reduction is happening in real time |
| Out | Shows output level, and doubles as a control — drag vertically to adjust makeup gain (-24 to +24dB) |
Master
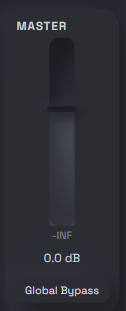
Controls the volume of the final output after all effects, and lets you bypass everything at once if needed.
| Control | Description |
|---|---|
| Master fader | Adjusts final output volume from -60 to +36dB |
| Global Bypass | Bypasses EQ, Dynamic EQ, Compressor, and all other effects, outputting the unprocessed (dry) signal. The button's border is highlighted in red while active. |
Presets
Save your current EQ, Dynamic EQ, Compressor, and Master settings under a name, and load them again later.

| Feature | Description |
|---|---|
| Load | Selecting a saved preset from the dropdown applies its EQ, Dynamic EQ, Compressor, and Master settings together |
| Save | Saves your current EQ, Dynamic EQ, Compressor, and Master settings as a new named preset |
| Folder icon | Opens the folder where preset files are stored, directly in File Explorer |
Per-section presets
Alongside the full preset above, the EQ, Dynamic EQ, and Compressor panels each have their own save button (disk icon) in their header, so you can save just that panel's settings on its own.
| Panel | Filename prefix |
|---|---|
| EQ | EQ_ |
| Dynamic EQ | DEQ_ |
| Compressor | COMP_ |
The prefix is added automatically when you save — you only need to type the name itself.
To load a section preset, click the EQ, DEQ, or COMP button at the bottom of the Preset panel to open a dropdown listing that section's saved presets.
Settings menu & bottom icons
Click the gear icon at the bottom of the screen to expand additional settings — language, tooltip visibility, the user guide, and more.

| Icon | Function |
|---|---|
| Circular arrow | Resets EQ, Dynamic EQ, Compressor, and Master to their defaults |
| Document | Opens the online user guide in your browser |
| Question mark | Toggles the hover tooltips that appear over knobs and buttons |
| Globe | Changes the app's UI language (9 languages total, including English and Korean) |
| Gear (Settings) | Expands or collapses the settings items below it |
Reset to Default
Use this when you've been adjusting EQ, Dynamic EQ, Compressor, and Master settings and want to return everything to its original state. Click the circular arrow icon at the top of the settings icon list to run it.
| Item | Description |
|---|---|
| What gets reset | EQ (4 bands, Peak, 50/200/1k/5k Hz, 0dB) · Dynamic EQ (Sub/Air defaults) · Compressor (4:1, 0.1ms, 300ms) · Master (0dB). Global Bypass is not reset to OFF. |
| What doesn't get reset | Language setting, tooltip visibility, license activation status, saved preset file list |
License & device change (Reset Device)
A single license key can only be used on one computer. If you replace your computer or do a fresh Windows install, you can change device registration yourself using the method below.
When you change devices
Launching the app on a new (or freshly reformatted) computer shows the license activation screen. Entering your existing key and clicking Activate may show an "activation limit" error, since it's already registered to another device. When this happens, a Reset Device button appears alongside it along with a purchase email field — enter the email address used at purchase, then click Reset Device to deregister the previous device and automatically re-register this computer.